Setting Up Custom Encryption in Ubuntu 20.04 (Focal Fossa)
04/27/2020 - ~7 Minutes
This post uses a lot of information from chroot For Fun and Profit .
The Ubuntu Linux distribution from Canonical gets a lot of praise; it also gets a lot of complaints. A lot of those complaints have to do with its installer. To be fair, the desktop installer is pretty good for beginners. It walks you through a series of intelligible steps, sets up a basic system with little or no fuss, and most non-default settings can easily be tweaked after the install. But, there’s always an exception….
The organization of disk storage, especially as it relates to encryption and thin provisioning of logical volumes, is a bit of a mess. If you tell the installer you want to use logical volume management, it complies by creating one logical volume that spans the entire disk. If you tell the installer you want encryption, you wind up with a similarly un-friendly configuration. So, most advanced users choose to manually configure the disks prior to running the installer. But, with encryption, this results in some complexity that needs to be explained.
The boot process is sufficiently advanced to handle LVM2 without any special intervention after the install. So, if you have configured LVM2 and have your disks carved into logical volumes, everything will just work. The boot process requires some setup within the installation before encryption will work. If you setup encryption, you have to do some tinkering after the installer is done, or you will wind up with an unbootable (albeit recoverable) system.
So, here’s our scenario.
The Hardware
We will use a single 20GB hard disk. The size is not important, but the examples will reflect that. We are going to break the disk into two partions, a small (512MB) boot parition, and the remainder of the disk in a single logical partition that will be encrypted. On that encrypted device, we will use LVM2 to allow for arbitrary partitions. These paritions will start small, but we can extend them later, via lvextend and resize2fs, should we want more space.
The Process
We will boot the machine (in the case of our example, a virtual machine) with the Ubuntu 20.04 Focal Fossa amd64 Desktop Distribution. After booting, we will choose Try Ubuntu, which will allow us to do some disk setup prior to running the installer. After the installer, we will choose to Continue Testing instead of immediately rebooting, which will allow us to do some tweaking of the boot process to compensate for encryption.
Partitioning with fdisk
After getting to the Ubuntu desktop, you can press ctrl-alt-T to launch terminal; you can also just find it in the menus. Once in the terminal, I usually type sudo -s to elevate privilege since everything we do will require superuser permissions.
The next step is to confirm the disk device we’ll be using. This is done with fdisk -l which lists the disks available for partitioning. In your case, the disk will almost surely be /dev/sda, but for our example, it’s /dev/vda. The following screenshot captures the interaction with fdisk. The final step is to use w to write the new partition table and exit.
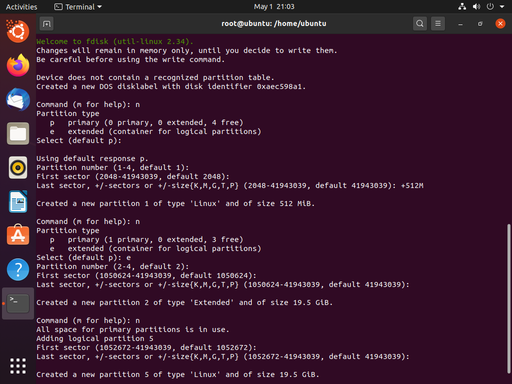
fdisk /dev/vda
n
<default>
<default>
<default>
+512M
n
e
<default>
<default>
<default>
n
<default>
<default>
w
We don’t need to format the boot partition (/dev/vda1) because the installer can do that. But we’ve got some work to do with encryption and LVM2. Let’s get encryption going first. We want to choose a name for the encrypted volume, because it will show up during the boot process. I like to use the name of the machine. Even though we’re only encrypting a part of the disk (almost all of it!), I like for the encryption to feel like it’s the whole machine. So, for this example, I’ll use testvm as the name.
cryptsetup luksFormat /dev/vda5
You will have to answer YES and provide a passphrase for the disk.
cryptsetup luksOpen /dev/vda5 testvm
You will have to provide the passphrase again, to unlock the disk. This will create a new device named /dev/mapper/testvm.
Now we can continue on to LVM2. First we will mark the decrypted device as a physical volume for LVM2 using pvcreate. Then we will create a volume group, which I will call ubuntu. Finally we will create three logical volumes within the volume group, named root, home, and swap. Their ultimate uses should be obvious, and you may feel free to make any customizations you’d like here, though you will need to have a root volume.

pvcreate /dev/mapper/testvm
vgcreate ubuntu /dev/mapper/testvm
lvcreate -L 8G -n root ubuntu
lvcreate -L 2G -n home ubuntu
lvcreate -L 2G -n swap ubuntu
Now our pre-work is done, and we’re ready to run the installer.
When the installer reaches the Installation type section, be sure to choose Something else, so we can tell the installer to use the partitions and volumes we just created. Select the following options:
/dev/mapper/ubuntu-root
- Use as: Ext4 journaling filesystem
- Format the partition: yes
- Mount point: /
/dev/mapper/ubuntu-home
- Use as: Ext4 journaling filesystem
- Format the partition: yes
- Mount point: /home
/dev/mapper/ubuntu-swap
- Use as: Swap area
/dev/vda1
- Use as: Ext2 filesystem
- Format the partition: yes
- Mount point: /boot
The end result should produce the following:
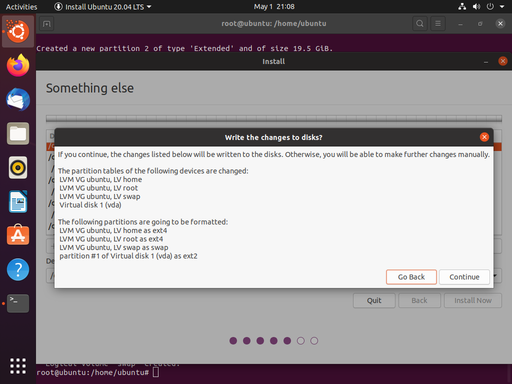
When the installation is complete, we want to Continue Testing, we can return to our terminal and do some last minute tweaking.
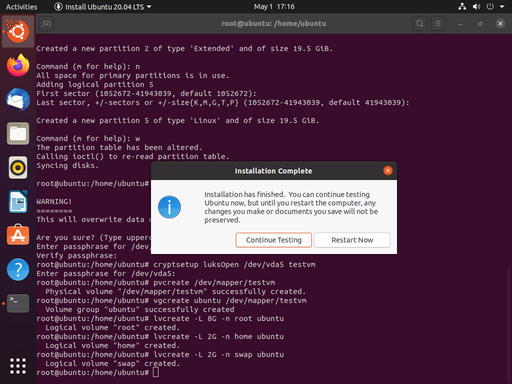
Before we go any further, we want to grab the UUID of our encrpted disk (e.g. /dev/vda5). We’re going to use this in a configuration file inside our newly installed system. For ease, I usually open a second terminal tab (shift-ctrl-T) and type sudo blkid /dev/vda5. This allows you to copy-paste (shift-ctrl-C, shift-ctrl-V) the UUID, instead of writing down on paper like some kind of barbarian.

Now we have to chroot into the newly installed system. This is the most complicated part of the story, and there’s a whole article about chroot right here . We need to mount our root partition at /mnt. Then we’ll need to mount some special pseudo-filesystems underneath /mnt. In the midst of all of that, we’ll jump in.
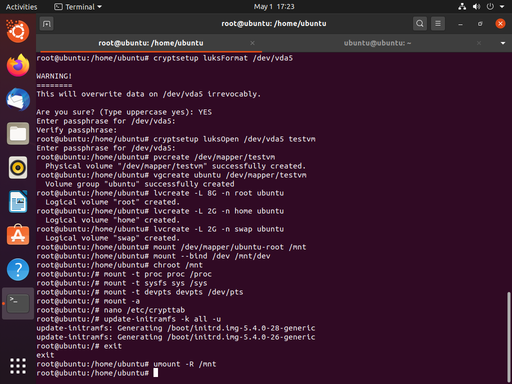
The reason behind all of this is that we need to appear to be running the newly installed system when we update the initramfs at the end of all of this. The process looks like this:
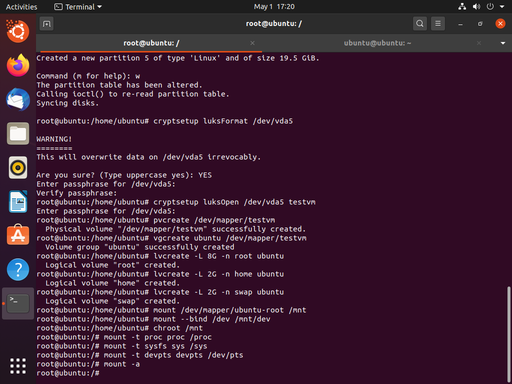
mount /dev/mapper/ubuntu-root
mount --bind /dev /mnt/dev
chroot /mnt
mount -t proc proc /proc
mount -t sysfs sys /sys
mount -t devpts devpts /dev/pts
mount -a
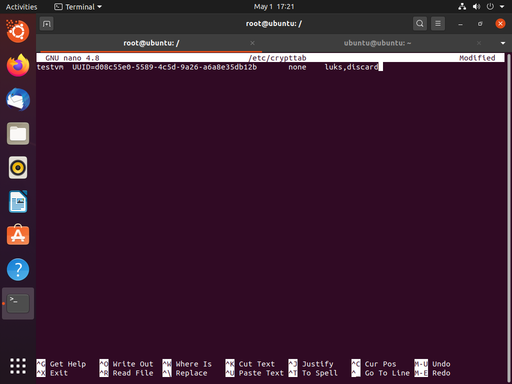
Now we want to edit (create) the /etc/crypttab file with nano (or your favorite editor). This file instructs the crypto system which devices to decrypt and how; it is similar in purpose and structure to the /etc/fstab file. Our entry will have three fields: the name of the decrypt device (testvm), the encrypted device (the UUID of /dev/vda5), the password (none, because it will be provided at boot time), and options. Note that while blkid returned the UUID in quotes, it is not surrounded by quotes in the /etc/crypttab file. Our example looks like:
testvm UUID=1960e826-e2a1-45db-a6ef-6fc979515ed6 none luks,discard
Now the stage is set to rebuild the initramfs, the non-kernel parts of linux that are used to initialize the boot process. In order to rebuild it, we use update-initramfs -k all -u. These options will cause the script to update the initramfs for all kernels installed on the system.

Now we can back out of our chroot with a simple exit command.
Back in our parent shell, we can unmount /mnt (recursively, to sweep up everything else) with umount -R /mnt.
Now we can exit our shell processes and reboot the system.
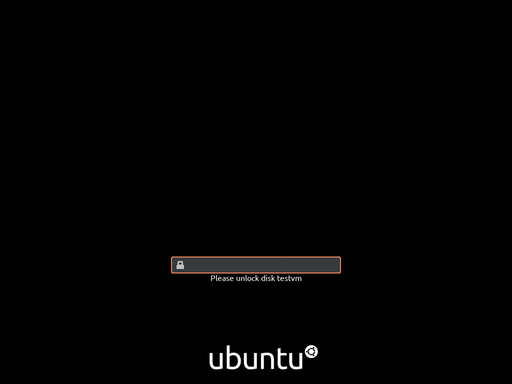
After the reboot, we should be greated by the system requesting our encryption passpharse to unlock testvm.
Congratulations!
chroot for Fun and Profit
04/04/2019 - ~5 Minutes
A fundamental part of a linux install, chroot is a powerful process isolation tool and one of
the precursors to today’s container technology. In this article, I want to quickly cover the basic
incantation of chrooting an Ubuntu Linux install.
This can be used to do some cool stuff immediately post-install. It can also be critical to rescuing a system that can no longere boot itself.
The general idea behind chroot is that “while booted into a running system, we can mount the
filesystem(s) of another install, and create a shell process that sees the second install as the
root filesystem.” This is what gives us the name chroot (or change root). Once you have executed
chroot you will not have any access outside the provided root filesystem tree. This allows you
to behave as if you are live within the chrooted filesystem.
There is a lot of information on this out at Linux From Scratch, Gentoo, and Arch Linux. All of these sites show you how to use chroot to create a new Linux installation from raw filesystems.
All you need to get started is a Linux machine, and a Live CD/USB. We will
- Boot from the Live CD/USB
- Mount the root filesystem of the installed system
- Do some special mounting of some devices
chrootinto the mount point- Do a little more special mounting
- Mount the rest of the filesystem(s), if any
- Have fun!
Boot from the Live CD/USB
You don’t really need help with this part, do you?
Mounting the root filesystem of the installed device, the Short Form
In a simple installation, there’s just one partition – the root partition. We want to mount that onto our /mnt point. So, let’s pretend that /dev/sda is our installed disk, making /dev/sda1 our partition. We would then
mount /dev/sda1 /mnt
Now, we can continue on to Do Some Special Mounting of Some Devices .
Mounting the root filesystem of the installed device, the Long Form
Let’s pretend that your installation was a little complicated. If it wasn’t, then this part gets a lot simpler. Let’s say you created a /boot partition on /dev/sda1, but then you have the rest of you install in LVM logical volumes that are hidden behind an encrypted /dev/sda5. Does that sound hokey enough for you? OK. Let’s roll.
Let’s decrypt the filesystem on /dev/sda5. We’ll create a dummy device called /dev/mapper/targetdisk, by virtue of the final argument below. We’ll be asked for the passphrase used when creating this disk. If you don’t have that passphrase, you can’t continue. The disk really is safely encrypted/locked behind that passphrase.
sudo cryptsetup luksOpen /dev/sda5 targetdisk
Since we concocted a super complicated partitioning scheme, we’re only about half-way through
mounting the root filesystem. Now we have to break out LVM2 and take things to the next level.
Step one is to find the logical volume that exists on /dev/mapper/targetdisk. The easiest way is
to use vgscan to scan for new volume groups.
sudo vgscan
Pay attention to the output, because you should see the name of a volume group from the newly
decrypted disk. We’ll need that name when we activate the volume group with vgchange. For
purposes of this example, we’ll pretend the volume group is called ubuntu-vg, which happens
to be the default name for volume groups created by the installer.
sudo vgchange -ay ubuntu-vg
We can now run lvscan to see all the new logical volumes that have become available to us.
It is also possible that you just know the names of the logical volumes, since it’s probably
your system that you’re playing with. Let’s pretend you found the volume used as the root, and
it happens to be called root-lv. Now, we can mount that in a convenient place, like /mnt.
sudo mount /dev/ubuntu-vg/root-lv /mnt
Do Some Special Mounting of Some Devices
This is a simple enough command. Simple enough to forget.
We want to mount the /dev filesystem into the /mnt/dev using the --bind option that will let
us mount one thing into two places. Any interaction with the /dev filesystem or the /mnt/dev
filesystem will be reflected in the other, because they are just two views of the same thing.
sudo mount --bind /dev /mnt/dev
chroot into the mount point
We’re finally ready for the big show! And, it will be a little disappointing after the complexity of mounting the root filesystem. But here it is…
sudo chroot /mnt
There is an optional parameter to define a custom program (shell) to run in the new environment, but
most likely we’ll just stick with what we were running before (most likely bash).
What may look odd to you is that you appear to be sitting at the / directory. In reality, you
are at the place formerly known as /mnt. But, now it appears as / from your new (chrooted)
perspective.
Do a little more special mounting
There are three special filesystems that we wait to mount until after the chroot. These will make your chroot environment complete.
mount -t proc proc /proc
mount -t sysfs sys /sys
mount -t devpts devpts /dev/pts
Mount the rest of the filesystem(s), if any
At this point, the remaining filesystem(s), if any, will be defined in /etc/fstab and can be
mounted quite quickly with a simple
mount -a
Have fun!
No you can enjoy your chrooted environment. You can install packages. You can reinstall the bootloader. The sky is the limit!