Setting Up Custom Encryption in Ubuntu 21.10 (Impish Indri)
02/24/2022 - ~8 Minutes
This post uses a lot of information from chroot For Fun and Profit . It is also a blatant copy + update of Setting Up Custom Encryption in Ubuntu 20.04 (Focal Fossa) .
The Ubuntu Linux distribution from Canonical gets a lot of praise; it also gets a lot of complaints. A lot of those complaints have to do with its installer. To be fair, the desktop installer is pretty good for beginners. It walks you through a series of intelligible steps, sets up a basic system with little or no fuss, and most non-default settings can easily be tweaked after the install. But, there’s always an exception….
The organization of disk storage, especially as it relates to encryption and thin provisioning of logical volumes, is a bit of a mess. If you tell the installer you want to use logical volume management, it complies by creating one logical volume that spans the entire disk. If you tell the installer you want encryption, you wind up with a similarly un-friendly configuration. So, most advanced users choose to manually configure the disks prior to running the installer. But, with encryption, this results in some complexity that needs to be explained.
The boot process is sufficiently advanced to handle LVM2 without any special intervention after the install. So, if you have configured LVM2 and have your disks carved into logical volumes, everything will just work. The boot process requires some setup within the installation before encryption will work. If you setup encryption, you have to do some tinkering after the installer is done, or you will wind up with an unbootable (albeit recoverable) system.
So, here’s our scenario.
The Hardware
We will use a single 25GB hard disk. The size is not important, but the examples will reflect that. We are going to break the disk into four partions, a 1MB BIOS Boot partition (see the Partitioning with fdisk section below for additional color on GPT partition tables in Ubuntu), a 513MB EFI parition, a 732MB boot partition to hold the kernels and the initramfs images, and the remainder of the disk in a single partition that will be encrypted. On that encrypted device, we will use LVM2 to allow for arbitrary partitions. These paritions will start small, but we can extend them later, via lvextend and resize2fs, should we want more space.
The Process
We will boot the machine (in the case of our example, a virtual machine) with the Ubuntu 21.10 Impish Indri amd64 Desktop Distribution. After booting, we will choose Try Ubuntu, which will allow us to do some disk setup prior to running the installer. After the installer, we will choose to Continue Testing instead of immediately rebooting, which will allow us to do some tweaking of the boot process to compensate for encryption.
Partitioning with fdisk
Ubuntu now uses GPT partition tables by default. This allows better support for UEFI machines. And, while this guide still focuses on BIOS booting, I will guide you through the creation of a partition table that is compliant with the new installer defaults.
After getting to the Ubuntu desktop, you can press ctrl-alt-t to launch terminal; you can also just find it in the menus. Once in the terminal, I usually type sudo -i to elevate privilege since everything we do will require superuser permissions.
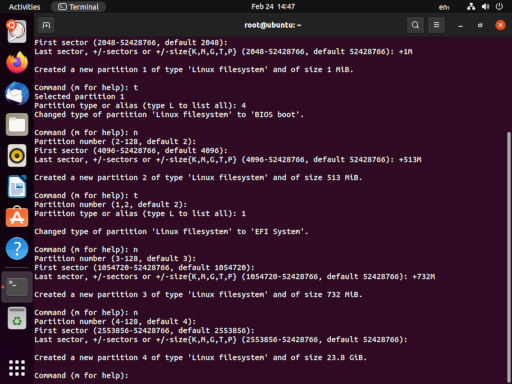
The next step is to confirm the disk device we’ll be using. This is done with fdisk -l which lists the disks available for partitioning. In your case, the disk will almost surely be /dev/sda, but for our example, it’s /dev/vda. The following screenshot captures the interaction with fdisk. The final step is to use w to write the new partition table and exit.

fdisk /dev/vda
g
n
<default>
<default>
+1M
t
4
n
<default>
<default>
+513M
t
<default>
1
n
<default>
<default>
+732M
n
<default>
<default>
<default>
w
We don’t want to format the BIOS Boot partition (/dev/vda1). And, we don’t need to format the boot partition (/dev/vda3) because the installer can do that; but we do need to format the new EFI partition (the installer refuses to do this under the mistaken assumption that any existing EFI partition already has important stuff in it). EFI partitions are Fat32 partitions, assumedly so that Microsoft operating systems can interact with them.
mkfs.fat -F 32 /dev/vda2
Additionally, we’ve got some work to do with encryption and LVM2. Let’s get encryption going first. We want to choose a name for the encrypted volume, because it will show up during the boot process. I like to use the name of the machine. Even though we’re only encrypting a part of the disk (almost all of it!), I like for the encryption to feel like it’s the whole machine. So, for this example, I’ll use testvm as the name.
cryptsetup luksFormat /dev/vda4
You will have to answer YES and provide a passphrase for the disk.
cryptsetup luksOpen /dev/vda4 testvm
You will have to provide the passphrase again, to unlock the disk. This will create a new device named /dev/mapper/testvm.
Now we can continue on to LVM2. First we will mark the decrypted device as a physical volume for LVM2 using pvcreate. Then we will create a volume group, which I will call ubuntu. Finally we will create three logical volumes within the volume group, named root, home, and swap. Their ultimate uses should be obvious, and you may feel free to make any customizations you’d like here, though you will need to have a root volume.
pvcreate /dev/mapper/testvm
vgcreate ubuntu /dev/mapper/testvm
lvcreate -L 8G -n root ubuntu
lvcreate -L 2G -n home ubuntu
lvcreate -L 2G -n swap ubuntu
Now our pre-work is done, and we’re ready to run the installer.
When the installer reaches the Installation type section, be sure to choose Something else, so we can tell the installer to use the partitions and volumes we just created. Select the following options:
/dev/mapper/ubuntu-root
- Use as: Ext4 journaling filesystem
- Format the partition: yes
- Mount point: /
/dev/mapper/ubuntu-home
- Use as: Ext4 journaling filesystem
- Format the partition: yes
- Mount point: /home
/dev/mapper/ubuntu-swap
- Use as: Swap area
/dev/vda3
- Use as: Ext2 filesystem
- Format the partition: yes
- Mount point: /boot
Use of the EFI partition (/dev/vda2) should be automatic. The BIOS Boot partition (/dev/vda1) should be largely ignored (though its existence is critical if you intend to boot via BIOS instead of UEFI).
The end result should produce the following:
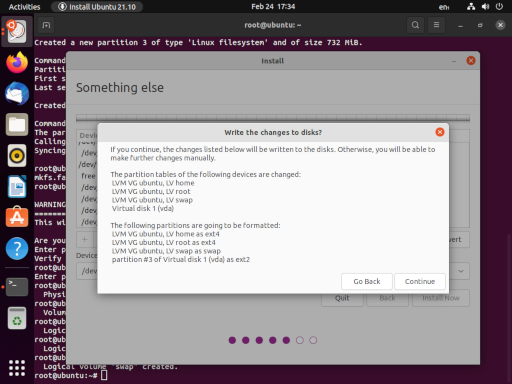
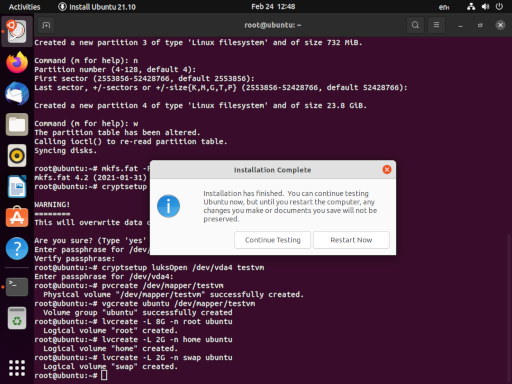
When the installation is complete, we want to Continue Testing, we can return to our terminal and do some last minute tweaking.
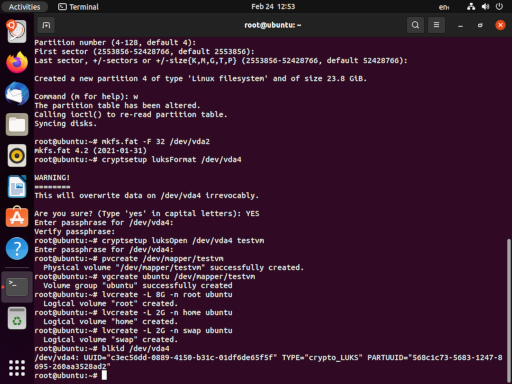
Before we go any further, we want to grab the UUID of our encrpted disk (e.g. /dev/vda5). We’re going to use this in a configuration file inside our newly installed system. For ease, I usually open a second terminal tab (shift-ctrl-T) and type blkid /dev/vda4. This allows you to copy-paste (shift-ctrl-C, shift-ctrl-V) the UUID, instead of writing down on paper like some kind of barbarian.
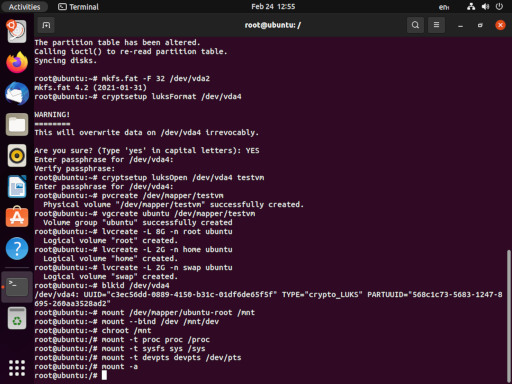
Now we have to chroot into the newly installed system. This is the most complicated part of the story, and there’s a whole article about chroot right
here
. We need to mount our root partition at /mnt. Then we’ll need to mount some special pseudo-filesystems underneath /mnt. In the midst of all of that, we’ll jump in. As a final step, we will execute a mount -a to make sure that /boot and /boot/efi (and any other useful partitions, if you’re extending this exercise and doing something more complicated) are mounted.
The reason behind all of this is that we need to appear to be running the newly installed system when we update the initramfs at the end of all of this. The process looks like this:
mount /dev/mapper/ubuntu-root
mount --bind /dev /mnt/dev
chroot /mnt
mount -t proc proc /proc
mount -t sysfs sys /sys
mount -t devpts devpts /dev/pts
mount -a
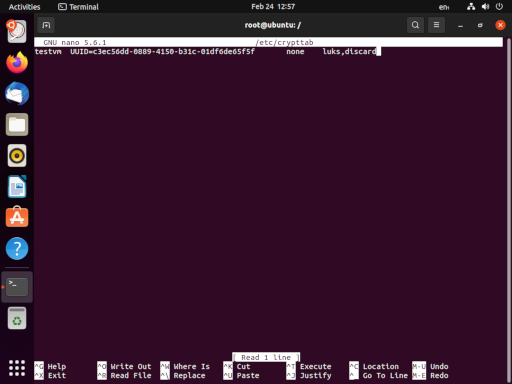
Now we want to edit (create) the /etc/crypttab file with nano (or your favorite editor). This file instructs the crypto system which devices to decrypt and how; it is similar in purpose and structure to the /etc/fstab file. Our entry will have four fields: the name of the decrypt device (testvm), the encrypted device (the UUID of /dev/vda5), the password (none, because it will be provided at boot time), and options. Note that while blkid returned the UUID in quotes, it is not surrounded by quotes in the /etc/crypttab file. Our example looks like:
testvm UUID=1960e826-e2a1-45db-a6ef-6fc979515ed6 none luks,discard
Now the stage is set to rebuild the initramfs, the non-kernel parts of linux that are used to initialize the boot process. In order to rebuild it, we use update-initramfs -k all -u. These options will cause the script to update the initramfs for all kernels installed on the system.
Now we can back out of our chroot with a simple exit command.
Back in our parent shell, we can unmount /mnt (recursively, to sweep up everything else) with umount -R /mnt.
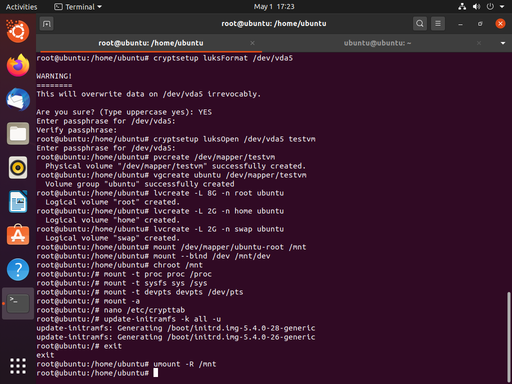
Now we can exit our shell processes and reboot the system.
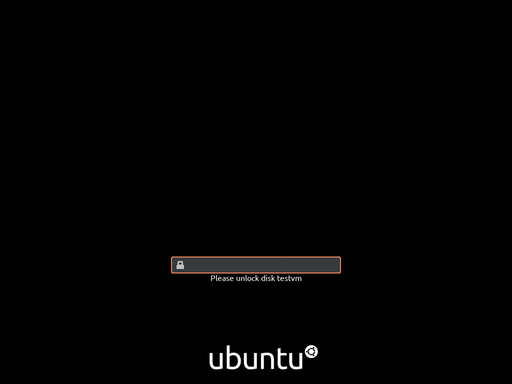
After the reboot, we should be greated by the system requesting our encryption passpharse to unlock testvm. Depending on your environment, the current state of Ubuntu, and possibly the phase of the moon… you might instead be greeted by a black screen. This is a combined failure of grub and plymouth to properly handle the video for your system. Most of the time you can type in your password and press enter despite a lack of visual feedback.
Congratulations!
Custom Encryption in Pop!_OS 20.04
05/01/2020 - ~3 Minutes
System 76 produces an Ubuntu-based Linux distribution called Pop!_OS . It contains better support than vanilla Ubuntu with respect to encrypted volumes, but only by a little bit. The improvements have to do with its ability to deal with disk allocation schemes created before starting the installer; the installer itself offers the same default named decrypt device with a single logical volume filling all available space. However, we can accomplish quite a bit by doing some work up front. And, unlike the Ubuntu scenario outlined in Setting Up Custom Encryption in Ubuntu 20.04 (Focal Fossa) , there is no need to swing back at the end to rebuild the initramfs. The only real caveat is that we have to let the installer open the encrypted volume. So this time, we’ll set everything up, and then close the encrypted volume before starting the installer.
Walk through the installer to configure the language and keyboard, until you reach the Clean Install vs Custom (Advanced) fork in the road.

At this point, launch a terminal window with super-T. If you’re new to Linux, the super key is the Windows key or the Command/Apple key.
In the terminal we’re going to use fdisk to create a partition scheme identical to the one in the Ubuntu article . The end result should be something like

Using cryptsetup to build or encrypted device leverages just two commands. As with Ubuntu, the /dev/vda device will likely be different on your machine (most likely /dev/sda). The final argument in the luksOpen line is the name you are giving to the decrypted volume. Not only can this be anything you’d like, it is completely arbitrary here; the real name will be established in the installer.
sudo cryptsetup luksFormat /dev/vda5
sudo cryptsetup luksOpen /dev/vda5 testvm

Now, we’ll repeat the LVM2 magic from the Ubuntu article. First mark the decrypted volume as a physical volume for LVM with pvcreate /dev/mapper/testvm. Then create a new volume group with vgcreate pop_os /dev/mapper/testvm. Finally, create the three logical volumes for root, home, and swap.
sudo pvcreate /dev/mapper/testvm
sudo vgcreate pop_os /dev/mapper/testvm
sudo lvcreate -L 8G -n root pop_os
sudo lvcreate -L 2G -n home pop_os
sudo lvcreate -L 2G -n swap pop_os
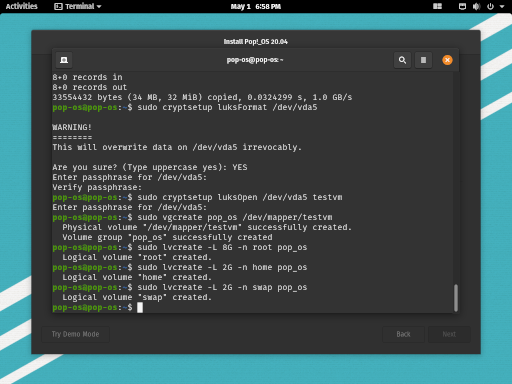
Before continuing in the installer, we need to deactivate all these special devices. This installer must open these devices itself in order to work properly. So, first, deactivate the volume group with vgchange -a n pop_os and then close the decrypted volume with cryptsetup luksClose testvm.
sudo vgchange -a n pop_os
sudo cryptsetup luksClose testvm
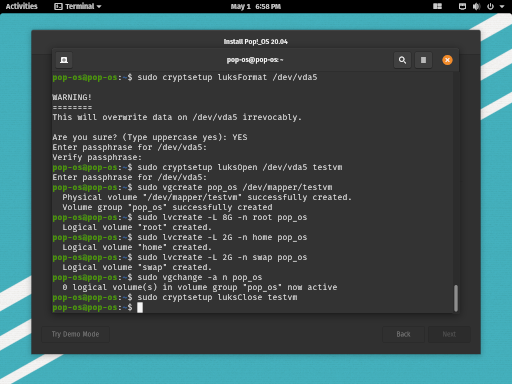
Back in the installer, choose Custom (Advanced). When the disk layout is displayed, click on the large (luks) volume to decrypt. At this point, choose the name you want to use as the device name. Also, provide the correct password.

Once you click Decrypt, the volume group should appear along with all your defined logical volumes. Mark all the devices appropriately. Don’t forget the /boot partition on /dev/vda1. Then click Erase and Install.

When the installation is complete, you can click Restart Device.

When Pop!_OS restarts, you should be greeted by the decryption prompt.

Congratulations!