Playing around with Incus
04/10/2024 - ~7 Minutes
LXD
Over coffee, I caught a video by Jay LaCroix (learnlinux.tv) from a few years ago about using LXD Linux Containers. Jay is a big Ubuntu guy, and his demo all started with snaps. I knew (or thought I knew) that LXD was generally available outside of the snap store, so I was undaunted.
I spent a few minutes getting LXD support turned on in NixOS and was ready to try some of this stuff!
Then I discovered that the images: repo ( https://images.linuxcontainers.org ) had decided to stop supporting LXD. Their decision, based around a lack of support from Canonical (and a bit of dislike for Canonical in the wake of some controversial decisions), seemed valid. But that still left me with only Ubuntu server images for LXD.
A little more reading told me about incus, the replacement for LXD. All the images that used to be at linuxcontainers.org are actually still there, but only for incus these days. So, a bit more fiddling: and LXD was out, and incus was in.
The Setup
Firstly, the NixOS incantation
{ config, lib, pkgs, ... }:
{
  virtualisation.incus = {
    enable = true;
    preseed = {};
  };
  networking.nftables.enable = true;
}
Importing this into my NixOS configuration.nix made incus available. Now I had to get it setup. My first step was getting into the incus-admin group, so I could communicate with the running daemon via its unix socket. A quick log-out and log-back-in, and I was ready to initialize the container system.
To do this, I ran incus admin init.
There are two big parts to this
Part 1, The Storage Pool
If you’re running on zfs or btrfs, you get to create either a zpool or a subvolume (respectively) to house your container and config storage. Once the storage area is provisioned, it is installed under /var/lib/incus. If you’re not one of the cool kids running zfs or btrfs, there are other supported solutions; but, as you might expect, you lose out on some of the coolness that backing your containers with a COW filesystem gives you.
Part 2, The Network Bridge
You can have incus create a network bridge for you, but I found this problematic. In my case, I already had a bridge built out with systemd-networkd that enabled my libvirt/qemu/kvm virtual machines to run as peers on the local network. I wanted this for my incus containers as well, so I ultimately declined the offer from the init script, and attached to my existing bridge with the following.
incus profile device add default eth0 nic nictype=bridged parent=br0 name=eth0
This created a default eth0 device (for my future containers) that was tied to my existing br0 bridge. Surprisingly, it actually worked. I was expecting a lot more difficultly, TBH. My network configuration is a little obscure. It took a long time to figure it out in Arch, and another long time to figure out how to port that over to NixOS. I was expecting a similar slog to get things working in incus, but voila….
Getting started with a continer
To date I’ve only tried setting up Debian Bookworm containers. So, this is hardly a comprehensive tour. But, I didn’t want to forget what I had typed, so I started jotting it down here. To create a new, running container all I had to type was
incus launch images:debian/12 my-first-incus
The container’s name is my-first-incus. It came from the images repo, and debian/12 was its image name/tag. At this point,
incus stop my-first-incus followed by incus start my-first-incus worked. And, after stopping, incus delete my-first-incus
cleans it all up – though the downloaded base image remains cached in the storage area. If you want to create a new container
but not start it up right away, then incus create my-next-incus is your friend. This would allow you to make some
config tweaks before it fires up.
Once the container is running, then incus exec my-first-incus -- bash will give you a shell inside the container.
Something Big
To see what I could do with this, I decided to look at replacing my Jellyfin VM with a Jellyfin incus container. This was especially tricky, since I had not taken great notes during the installation and configuration of the Jellyfin server – and there was zero IaC automation.
At a minimum, I wanted to record the steps it took to get Jellyfin up and running. In a perfect world, I’d even have automation for it. I was thinking… maybe ansible could help here. And while ansible could probably be shoehorned in as a solution, it didn’t seem like a great fit.
For the first pass, I used… a bash script. I mean, it’s better than nothing, right?
I gathered up four files I had laying around from the initial config of the Jellyfin server
- My CA certificate
- The signed Jellyfin certificate
- The Jellyfin server key
- The jellyfin.conf file that gets handed to nginx to reverse-proxy (and TLS-ify) Jellyfin
incus launch images:debian/12 jellyfin
Then, I pulled up the How to install Jellyfin on Debian page at jellyfin.org and got to work. The first part of the install got curl and gnupg installed on the target machine so I could use them to pull down the signing key. But, it seemed easier to just do that on the host machine. Then I could just push the resultant file into the container.
curl -fsSL 'https://repo.jellyfin.org/jellyfin_team.gpg.key' | gpg --dearmor -o jellyfin.gpg
incus file push ./jellyfin.gpg jellyfin/etc/apt/keyrings/jellyfin.gpg -pv
EDIT: it turns out I did need, or seemed to need curl and gnupg for stuff to work. So,
incus exec jellyfin -- apt-get -y install curl gnupg
The trailing options on the incus file push work exactly like mkdir –
any needed directory are created and the output is verbose.
Now, I needed an apt sources file. They had a complex formula for creating it. It was more reasonable to create a file named jellyfin.sources and put the following in it
Types: deb
URIs: https://repo.jellyfin.org/debian
Suites: bookworm
Components: main
Architectures: amd64
Signed-By: /etc/apt/keyrings/jellyfin.gpg
After this, I could push that file into the container with
incus file push ./jellyfin.sources jellyfin/etc/apt/sources.list.d/jellyfin.sources -pv
Now the repo definition is setup, the public signing key is in place, and we’re ready for some sexy apt-get action!
incus exec jellyfin -- apt-get update
incus exec jellyfin -- apt-get -y install jellyfin
Now, technically, Jellyfin is up and running inside the container. But, it’s time to get nginx in place. So, we should install it. And then we should move our config files into place.
incus exec jellyfin -- apt-get -y install nginx

incus file push ./jellyfin.conf jellyfin/etc/nginx/conf.d/jellyfin.conf -pv
incus file push ./jellyfin.crt jellyfin/etc/nginx/ssl/jellyfin.crt -pv
incus file push ./jellyfin.key jellyfin/etc/nginx/ssl/jellyfin.key -pv
incus file push ./ca.crt jellyfin/etc/nginx/ssl/ca.crt -pv
A quick diversion into NFS
I have my media served up by TrueNAS via NFS. That’s how the existing Jellyfin VM gets access to it. I need figure that out. Unsurprisingly, NFS isn’t very easy to pull of with incus containers. So, it turns out that the solution is to create special pseudo-disks that map to the places where the NFS shares are mounted on the host.
incus config device add jellyfin movies disk source=/srv/nfs/nas/media/movies path=/media/movies
incus config device add jellyfin shows disk source=/srv/nfs/nas/media/television path=/media/shows
This creates two devices in the jellyfin container. One named movies that maps the host directory /srv/nfs/nas/media/movies to the container directory /media/movies. The other does the same for television shows, disguising the fact that TrueNAS is still exporting the share with the old name of television, but Jellyfin prefers shows.
Back to your regularly scheduled nginx configuration
The final step is to remove the default website from nginx, since our configuration is all in jellyfin.conf, and restart nginx with all this new configuration goodness. This default website configuration file (actually a symlink) is /etc/nginx/sites-enabled/default, and we just need to tell incus to remove it. Then we’ll use systemd to restart nginx.
incus file delete jellyfin/etc/nginx/sites-enabled/default -v
incus exec jellyfin -- systemctl restart nginx
At this point, we just need to figure out where our running container is (network-wise) and use the Jellyfin web-ui to finish setup.
incus list jellyfin
Now, point the web browser at that address.
- select your languae (e.g. English)
- create a user in Jellyfin (e.g. jellyfin)
- add a media library for movies, pointing to the /media/movies folder
- add a media library for shows, pointing to the /media/shows folder
Then, just give Jellyfin a few moments to gather up the media and download metadata, you’re ready to start watching!
The Code
I put the script, and its supporting files (minus the SSL keys) into a GitHub repo . The jellyfin.conf file might be of interest; it is almost entirely cribbed from a sample file at jellyfin.org. But, I’ve made the necessary adjustments for it to run out of the box in my solution.
NixOS Demo Script
03/27/2024 - ~5 Minutes
Install NixOS via the graphical installer
Nothing really special; just remember to select Allow Non-Free near the end of the (Calamares) installation wizard. It will be easier if the user created is named “demo”, otherwise there is a deviation from the script later on. Choose the graphical desktop you’d like to use.
Add a new package to the
Since the default installation does not include vim, let’s use nix-shell -p vim to temporarily make it available.
Add the google-chrome package to the user’s package list (sudo vim /etc/nixos/configuration.nix).
While you’re in there, rename the system via networking.hostname = "demo"; in the config.
Also, it is important to add the settings that enable flakes (‘cause we’re getting there shortly); add nix.settings.experimental-features = [ "nix-command" "flakes" ]; to the bottom of the configuration.nix file.
Then perform a sudo nixos-rebuild switch. Show it running!
You will have to reboot to see the new hostname, and you should since we’ll use it below….
Exit the nix-shell and show that vim goes away from the user environment; remind everyone that the package and its dependencies still exist in /nix/store.
A quick summary of this step:
nix-shell -p vim- set hostname to demo by modifying existing declaration to read
networking.hostname = "demo";in the configuration.nix file - add
google-chrometo the user’s package list in the configuration.nix file - add
nix.settings.experimental-features = [ "flakes" "nix-command" ];to the bottom of the configuration.nix file exitnixos-rebuild switch- [optional]
reboot
Get Flakey!
Change directory into /etc/nixos and run sudo nix flake init to create a new instance of a basic flake template. Everything in the inputs section is good; the entirety of the outputs section can be replaced with the following:
nixosConfigurations.demo = nixpkgs.lib.nixosSystem { modules = [ ./configuration.nix ]; };
In the above, the demo token represents the hostname (which we changed from nixos to demo in the previous section).
Now, run sudo nixos-rebuild boot and a lot will happen!
If you have not yet rebooted, be sure to add --flake .#demo to override the hostname to flake configuration mapping.
We’re using nixos-rebuild boot since the drastic level of change implies we should reboot (likely an update kernel, for instance).
- The flake will lock in the current git hash of the nixos-unstable branch, and download the nixpkgs metadata for that revision
- All packages will be updated to the current unstable version
- The flake.lock file will be created to preserve this version of the system.
Now would be a good time to show off the lock file and display how it “follows” the nixos-unstable branch, but “locks” the particular rev.
Might be a good idea to reboot now (since our changes are waiting for us in the next generation).
There’s no place like Home (Manager)
After this big reboot, login as the unprivileged user. Let’s install home-manager! I chose the standalone configuration to underscore the distinction between user configuration and system configuration. There is another way (home-manager as a nixos module) which is left as an exercise for the reader.
As the user, we first need to add a nix-channel. This is something that happened (for the system user) behind the scenes during the install. It is also something that will be quickly surplanted by the flake we will create. Nonetheless
nix-channel --add https://github.com/nix-community/home-manager/archive/master.tar.gz home-manager
nix-channel --update
For whatever reason (still haven’t quite sorted this out, honestly), you have to log out and back in again. Something needs to be sourced into the environment, but I haven’t found it.
Once you’re back in you can install home-manager with the following incantation
nix-shell '<home-manager>' -A install
This actually creates our first home-manager generation.
It also makes the home-manager tool generally available to us.
From now on out, new generations of home-manager can be created with home-manager switch.
Customizing our user environment
Though the magic of nix, we can configure our user environment, and be reasonable isolated from the system environment.
Let’s add and configure vim so we have access to it in our user environment.
First let’s do our nix-shell -p vim trick from earlier so we don’t have to fumble through using nano.
Then let’s add the following into our home.nix file via vim ~/.config/home-manager/home.nix
  programs.vim = {
    enable = true;
    settings = {
      expandtab = true;
      tabstop = 2;
      number = true;
      relativenumber = true;
      shiftwidth = 2;
    };
  };
Without even needing to add the package to the list, we will have vim and it will be configured to our (well, my) liking.
A quick home-manager switch will make this a reality.
A more complicated Flake for Home-Manager
The home-manager flake is more complicated than the nixos flake, because home-manager has multiple inputs (home-manager and nixpkgs), and we want to keep the two closely tied to each other.
We can start with the template, but here’s the full flake.nix file after modifications… or you can just write if from scratch using vim
The occurrence of “demo” below corresponds to the presumed username demo. If you have created a different unprivileged user, then replace the existing token with your new name.
{
  description = "Demo Flake for Home-Manager (Standalone)";

  inputs =  {
    nixpkgs.url = "github:nixos/nixpkgs/nixos-unstable";
    home-manager = {
      url = "github:nix-community/home-manager";
      inputs.nixpkgs.follows = "nixpkgs";
    };
  };

  outputs = { self, nixpkgs, home-manager, ... }:
  let
    system = "x86_64-linux";
    pkgs = import nixpkgs { system = "${system}"; config.allowUnfree = true; };
  in {
    homeConfigurations."demo" = home-manager.lib.homeManagerConfiguration {
      inherit pkgs;

      modules = [ ./home.nix ];
    };
  };
}
As I understand it, the follows line indicates the the nixpkgs supporting home-manager should follow the main nixpkages input (e.g. nixos-unstable). Again as I understand it, the is designed primarily to reduce system size by not duplicating packages that differ ever so slightly. However, Nix is fully capable of supporting (successfully) these inputs being disconnected. Any package used by one will pull in the correct versions of its dependencies, while the same package (different version) included in by the other input will pull its dependencies.
Regardless, now is the time to implement!
home-manager switch
Watch all the fun!
Additional Materials/Content
The slides are available online.
NixOS Configuration Search/Wiki
Home Manager Options Search
NixOS
03/12/2024 - ~12 Minutes
Introduction
Get started with
NixOS
. NixOS is a unique Linux Distribution. Traditional Linux distros install a single version
of a library or an application into the accepted filesystem hierarchy (e.g. /bin, /lib, /usr/bin, /usr/lib, etc.). NixOS uses the
nix package manager to install everything into the /nix/store, and then creates links to interconnect the currently chosen packages.
This allows for an amazing rollback option, since every change to the build creates an entirely new configuration, and old configurations can be left on the system for as long as you’d like. This has some throwbacks to Microsoft’s System Restore Points (the major difference being that nix seems to actually work).
NixOS GNOME Installer
Download the installer from here . This is a traditional Calamares installer running on a GNOME Live-CD. There is one caveat, if you are using a laptop: The installer will automatically launch before you have a chance to establish wi-fi connectivity; it will complain, not allowing you to proceed, but will never detect the presence of the internet after that. The installer will need to be stopped and restarted after wi-fi is connected. Sorry about that.
There is also a KDE-based Live-CD which is identical, aside from the underlying desktop manager.
A More Complicated Install
Download the minimal installer from here .
As a recovering Arch user, this is where I’m most comfortable because here I have actual control over the disk layout supporting my installation. I have options not available in the Calamares installer. The Calamares installer will offer the option of LUKS encryption for your files, but will only be able to create a single ext4 filesystem on the decrypted device. There is no ability to use LVM (either on or under LUKS), or to use btrfs to supply volumes on top of LUKS, or to do something truly nutty like ZFS.
Unlike Arch, the installer throws you to a prompt as an unprivleged user! First things first, sudo su -. You can’t get anything
useful done unless you are root!
Just like Arch, the first challenge is getting the installer online with commandline only tools. The method of choice here is
wpa_supplicant. You will need to start it up with systemctl start wpa_supplicant and then enter wpa_cli. Here instructions
are at a premium, but the process is straightforward.
- create a new network configuration with
add_network; this will return the network number (0 zero) which will be used below - identify the SSID you want with
set_network 0 ssid "TheNameOfYourSSID"(replacing TheNameOfYourSSID with the actual name of your SSID) - provide the wi-fi key with
set_network 0 psk "YourWifiPassphrase"(replacing YourWifiPassphrase with your actuall wi-fi passphrase) - then finish with
enable_network 0
Wait for the wpa_supplicant to report CONNECTED in the output, then you can exit the wpa_cli. At this point, the dhcp client should
take over and get you and address, gateway, nameserver, etc. There is sometimes a short delay while this is happening. Checking with
ip a should let you know when you have an address and are ready to proceed.
Below are my formulae for setting this up. All these examples use GRUB on UEFI, but should be just as easily implemented on legacy (BIOS) hardware by either creaing a 1M BIOS Boot partition in the GPT, or by using a DOS partition table. Additionally, all examples leverage a legacy SCSI/SATA drive (/dev/sda), instead of a more modern PCIe NVME drive (/dev/nvme0n1); the most notable difference is that the SCSI driver merely appends the partition number to the end of the device name (e.g. /dev/sda1) whereas the newer driver adds a “p” because the device name already ends in a digit (e.g. /dev/nvme0n1p1).
NB –> You might want to enable one of the networking packages before installing and rebooting, especially if you are using wi-fi. NetworkManager is the obvious choice if you are going to be using any of the graphical desktops (though you might want to familiarize yourself with nmcli, if you’re holding off on the actual desktop setup); the other option is to use wpa_supplicant, like the minimal installer did. But, by default, neither of these will be included in your installation without uncommenting a line from the generated configuration.nix file.
LUKS Encryption with Btrfs subvolumes
This scenario is the closest to what we can get with the Calamares installer. We will encrypt a single partition and put a single filesystem on the decrypted volume. However, we will make use to btrfs subvolumes to make our installation more interesting. So, the partitioning is pretty straightforward.
parted /dev/sda -- mktable gpt
parted /dev/sda -- mkpart fat32 1M 512M
parted /dev/sda -- set 1 esp on
parted /dev/sda -- mkpart linux 512M 100%
The next step is to create the LUKS encrypted volume (on /dev/sda2) and to get it decrypted to /dev/mapper/crypt. The use of the name crypt is arbitrary. You can use any name you’d like; just be sure to update any reference to crypt and /dev/mapper/crypt to use your name.
cryptsetup luksFormat /dev/sda2
cryptsetup open /dev/sda2 crypt
The formatting is a little special since we incorporate the creation of btrfs subvolumes into this step. To do this, we mount the btrfs filesystem and use the btrfs tooling to create the subvolumes; the we unmount the btrfs filesystem, so it can be remounted appropriately (using those subvolumes we created).
mkfs.fat -F 32 /dev/sda1
mkfs.btrfs /dev/mapper/crypt
mount /dev/mapper/crypt /mnt
for sv in @{,nix,var,home}; do
  btrfs subv create /mnt/$sv
done
umount /mnt
Now it’s time to get everything mounted, and kick off the install.
mount -o subvol=@ /dev/mapper/crypt /mnt
for sv in {nix,var,home}; do
  mount --mkdir -o subvol=@$sv /dev/mapper/crypt /mnt/$sv
done
mount --mkdir -o umask=0077 /dev/sda1 /mnt/boot

nixos-generate-config --root /mnt
Due to the simplicity of the configuration (read: its similarity to what the Calamares installer can do), there isn’t any special configuration to get this to work. All the magic for the LUKS encryption and the brtfs filesystems should be in /mnt/etc/nixos/hardware-configuration.nix.
With this configuration is in place, now is the time to confirm that you have enabled a networking package, and that you have done any additional NixOS configuration you’d like to do.
Then install (you will be prompted for a root password) and reboot. Then enjoy!
nixos-install
reboot
LVM on LUKS
This scenario involves creating a single encrypted partition, and using the decrypted device as a physical volume for LVM. In this configuration, we can have multiple filesystems (logical volumes) all tied to a single encrypted volume. Begin by partitioning the disk with
parted /dev/sda -- mktable gpt
parted /dev/sda -- mkpart fat32 1M 512M
parted /dev/sda -- set 1 esp on
parted /dev/sda -- mkpart linux 512M 100%
Now we can format the EFI partition (/dev/sda1) and use cryptsetup to encrypt /dev/sda2; follow the prompts for cryptsetup.
In the final line, we open the encrypted partition and create named device (crypt) which will be at /dev/mapper/crypt. This is
where we will begin our LVM work.
mkfs.fat -F 32 /dev/sda1
cryptsetup luksFormat /dev/sda2
cryptsetup open /dev/sda2 crypt
Now we can use /dev/mapper/crypt as a physical volume and create a volume group (named nixos, here).
pvcreate /dev/mapper/crypt
vgcreate nixos /dev/mapper/crypt
Now we can create some logical volumes, and format them. I chose ext4, but you can use any filesystem you see fit.
lvcreate -L 16G -n system nixos
lvcreate -L 32G -n nix nixos
lvcreate -L 8G -n var nixos
lvcreate -L 8G -n home nixos

for lv in {system,nix,var,home}; do
  mkfs.ext4 /dev/nixos/$lv
done
Now comes the magical time to mount all the filesystems where we want them, and have NixOS generate an initial configuration. We will have to update the configuration to make it work, though.
mount /dev/nixos/system /mnt
for lv in {nix,var,home}; do
  mount --mkdir /dev/nixos/$lv /mnt/$lv
done
mount --mkdir -o umask=0077 /dev/sda1 /mnt/boot

nixos-generate-config --root /mnt
Now, we need to add some carefully crafted nix-speak into our newly generated /mnt/etc/nixos/configuration.nix file.
We want to find the line that says boot.loader.systemd-boot.enable = true; and replace it with the block below.
This will tell it to use GRUB over UEFI (instead of systemd-boot), and provide some key configuration:
boot.loader.grub.enableCryptodisk = truewill allow grub to unlock the LUKS volumeboot.initrd.luks.devices.cryptidentifies the namecryptas the decrypted volume (you can change this value if you wish)boot.initrd.luks.devices.crypt.deviceidentifies encrypted volume we need to decrypt, here using its UUID (you must change this value to the correct UUID of the /dev/sda2 partition)boot.initrd.luks.devices.crypt.preLVM = true;tells the initrd to unlock the disk before scanning for LVM volume groupsboot.initrd.services.lvm.enable = true;tells the initrd to do the LVM magic
  boot = {
    loader = {
      systemd-boot.enable = false;
      grub = {
        enable = true;
        device = "nodev";
        efiSupport = true;
        enableCryptodisk = true;
      };
      efi = {
        canTouchEfiVariables = true;
        efiSysMountPoint = "/boot";
      };
    };
    initrd = {
      luks.devices.crypt = {
        device = "/dev/disk/by-uuid/3348173a-e1dc-44ef-aeb8-cb263273719b";
        preLVM = true;
      };
      services.lvm.enable = true;
    };
  };
With this configuration is in place, now is the time to confirm that you have enabled a networking package, and that you have done any additional NixOS configuration you’d like to do.
Then install (you will be prompted for a root password) and reboot. Then enjoy!
nixos-install
reboot
LUKS on LVM
This scheme is the logical reverse of LVM on LUKS. Here we setup the logical volume manager on an unencrypted partition and encrypt logical volumes, as needed. Included here is the use of Nix’s randomEncryption to create a SWAP partition (logical volume) that is dynamically encrypted with a random key at each boot, making swap data completely unavailable (read: safe) betwwen boots.
Partition and format the disk.
This differs from previous examples only in that we tagging /dev/sda2 as a physical volume for LVM using parted.
Of course, we still have to do the pvcreate step.
parted /dev/sda -- mklable gpt
parted /dev/sda -- mkpart fat32 1MiB 512MiB
parted /dev/sda -- set 1 esp on
parted /dev/sda -- mkpart 512MiB 100%
parted /dev/sda -- set 2 lvm on

mkfs.fat -F 32 /dev/sda1
pvcreate /dev/sda2
Setup the Logical Volume Manager. Create a Volume Group named (arbitrarily) nixos.
Then we’ll add a 32G Logical Volume named crypt for the OS and an 8G one named swap for the
encrypted swap.
vgcreate nixos /dev/sda2
lvcreate -L 32G -n crypt nixos
lvcreate -L 8G -n swap nixos
Now that we have a logical volume (/dev/nixos/crypt) we can use cryptsetup to, well, setup our encryption.
cryptsetup luksFormat /dev/nixos/crypt
cryptsetup open /dev/nixos/crypt system
Having created /dev/mapper/system, we can format (I’ll use ext4 for simplicity).
mkfs.ext4 /dev/mapper/system

mount /dev/mapper/system /mnt
mount --mkdir -o umask=0077 /dev/sda1 /mnt/boot
Now we can generate the initial configuration.
nixos-generate-config --root /mnt
The following extra configuration will need to go into /mnt/etc/nixos/configuration.nix, replacing the line
boot.loader.systemd-boot.enable = true;. Much of the explanation of this block appear in the LVM on LUKS section,
but I’ll highlight the one difference
boot.initrd.luks.devices.btrfs.preLVM = false;because we want LUKS to sort itself after we’ve processed all the LVM devices
Just like the LVM on LUKS configuration, you will need to use the correct UUID in the device line; but this time, it’s a little simpler.
  boot = {
    loader = {
      systemd-boot.enable = false;
      grub = {
        enable = true;
        device = "nodev";
        efiSupport = true;
        enableCryptodisk = true;
      };
      efi = {
        canTouchEfiVariables = true;
        efiSysMountPoint = "/boot";
      };
    };
    initrd = {
      luks.devices.system = {
        device = "/dev/nixos/crypt";
        preLVM = false;
      };
      services.lvm.enable = true;
    };
  };
Adding encrypted swap. This results in the same configuration that’s outlined in the ArchLinux Wiki section 5.6 _Configuring fstab and crypttab. Of course here it’s declarative, instead of procedural.
  swapDevices = [
    { device = "/dev/nixos/swap";
      randomEncryption = {
        enable = true;
        cipher = "aes-xts-plain64";
        source = "/dev/urandom";
        keySize = 512;
      };
    }
  ];
Encrypted ZFS
Using ZFS (with it’s internal encryption) allows the best of all three of the preceding methods, but leveraging only a single technology. That being said, ZFS on Linux is relatively niche; the understanding level is low and the number of examples is correspondingly small.
The initial partitioning should look familiar.
parted /dev/sda -- mklable gpt
parted /dev/sda -- mkpart fat32 1MiB 512MiB
parted /dev/sda -- set 1 esp on
parted /dev/sda -- mkpart 512MiB 100%
Now we can format the /boot partition and do the ZFS magic on the second partition to create a zpool named nixos. The first three -O
parameters can be omitted if you do not want encryption.
mkfs.fat -F 32 /dev/sda1

zpool create -O encryption=on -O keyformat=passphrase -O keylocation=prompt \
    -O compression=on -O mountpoint=none -O xattr=sa -O acltype=posixacl \
    -o ashift=12 -f nixos /dev/sda2
Now, we can create ZFS datasets within the zpool. Datasets are like the logical volumes of LVM (except they already have a filesystem on them).
for ds in {root,nix,var,home}; do
  zfs create -o mountpoint=legacy nixos/$ds
done
Now these datasets can be mounted for the config generation. Also, mount the /boot partition.
mount -t zfs nixos/root /mnt
for ds in {nix,var,home}; do
  mount --mkdir -t zfs nixos/$ds /mnt/$ds
done
mount --mkdir -o umask=0077 /dev/sda1 /mnt/boot
Now we can generate the initial config with
nixos-generate-config --root /mnt
And edit the config, once again replacing the boot.loader.systemd-boot.enable = true; line with the following.
  boot.loader = {
    systemd-boot.enable = false;
    grub = {
      enable = true;
      zfsSupport = true;
      efiSupport = true;
      efiInstallAsRemovable = true;
      device = "nodev";
    };
    efi = {
      canTouchEfiVariables = false;
      efiSysMountPoint = "/boot";
    };
  };

  networking.hostId = "00000000";
The networking.hostId is used by ZFS and should be generated with the following incantation .
head -c4 /dev/urandom | od -A none -t x4
FWIW, I keep my networking.hostId in a separate networking configuration (.nix); it can go anywhere, but you have to have one.
A final word about swap space
Only one of the above examples included swap. I largely don’t go in for swap,
as I seem to have enough RAM on my systems these days for whatever I want to do.
Also, these days, all the cool kids are using compressed RAM swap. On Arch I used
the zram-generator package; on NixOS I use zramSwap.enable = true; in my configuration.nix file.
Feel free to add this in. It will nominally use 50% of your RAM as compressed swap.
Here’s a link to some additional information about
zram
.
Resources
- NixOS.org website.
- NixOS package and configuration database search .
- ArchLinux Wiki
Converting m4a to mp3
03/12/2024 - ~1 Minute
Install ffmpeg. Your mileage may vary, as every OS has a different way to install the package. However, it is universally available. You will also need libmp3lame, if you don’t have have it. For me, I used nix-shell.
nix-shell -p ffmpeg
ffmpeg -i input.m4a -c:v copy -c:a libmp3lame -q:a 3 output.mp3
This is copying the video, which is a NOP since there is no video, and converting the audio with libmp3lame.
The -q:a 3 is a quality setting; the lower the number, the better the quality (three seems like a good value).
Setting Up Custom Encryption in Ubuntu 21.10 (Impish Indri)
02/24/2022 - ~8 Minutes
This post uses a lot of information from chroot For Fun and Profit . It is also a blatant copy + update of Setting Up Custom Encryption in Ubuntu 20.04 (Focal Fossa) .
The Ubuntu Linux distribution from Canonical gets a lot of praise; it also gets a lot of complaints. A lot of those complaints have to do with its installer. To be fair, the desktop installer is pretty good for beginners. It walks you through a series of intelligible steps, sets up a basic system with little or no fuss, and most non-default settings can easily be tweaked after the install. But, there’s always an exception….
The organization of disk storage, especially as it relates to encryption and thin provisioning of logical volumes, is a bit of a mess. If you tell the installer you want to use logical volume management, it complies by creating one logical volume that spans the entire disk. If you tell the installer you want encryption, you wind up with a similarly un-friendly configuration. So, most advanced users choose to manually configure the disks prior to running the installer. But, with encryption, this results in some complexity that needs to be explained.
The boot process is sufficiently advanced to handle LVM2 without any special intervention after the install. So, if you have configured LVM2 and have your disks carved into logical volumes, everything will just work. The boot process requires some setup within the installation before encryption will work. If you setup encryption, you have to do some tinkering after the installer is done, or you will wind up with an unbootable (albeit recoverable) system.
So, here’s our scenario.
The Hardware
We will use a single 25GB hard disk. The size is not important, but the examples will reflect that. We are going to break the disk into four partions, a 1MB BIOS Boot partition (see the Partitioning with fdisk section below for additional color on GPT partition tables in Ubuntu), a 513MB EFI parition, a 732MB boot partition to hold the kernels and the initramfs images, and the remainder of the disk in a single partition that will be encrypted. On that encrypted device, we will use LVM2 to allow for arbitrary partitions. These paritions will start small, but we can extend them later, via lvextend and resize2fs, should we want more space.
The Process
We will boot the machine (in the case of our example, a virtual machine) with the Ubuntu 21.10 Impish Indri amd64 Desktop Distribution. After booting, we will choose Try Ubuntu, which will allow us to do some disk setup prior to running the installer. After the installer, we will choose to Continue Testing instead of immediately rebooting, which will allow us to do some tweaking of the boot process to compensate for encryption.
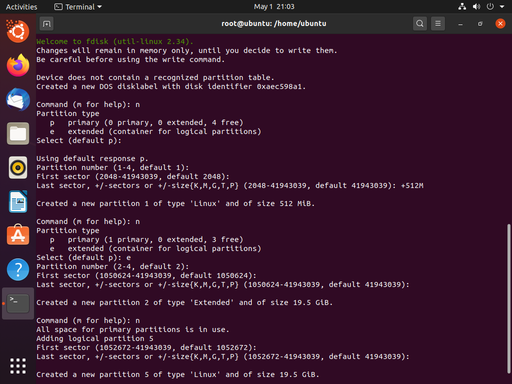
Partitioning with fdisk
Ubuntu now uses GPT partition tables by default. This allows better support for UEFI machines. And, while this guide still focuses on BIOS booting, I will guide you through the creation of a partition table that is compliant with the new installer defaults.
After getting to the Ubuntu desktop, you can press ctrl-alt-t to launch terminal; you can also just find it in the menus. Once in the terminal, I usually type sudo -i to elevate privilege since everything we do will require superuser permissions.
The next step is to confirm the disk device we’ll be using. This is done with fdisk -l which lists the disks available for partitioning. In your case, the disk will almost surely be /dev/sda, but for our example, it’s /dev/vda. The following screenshot captures the interaction with fdisk. The final step is to use w to write the new partition table and exit.

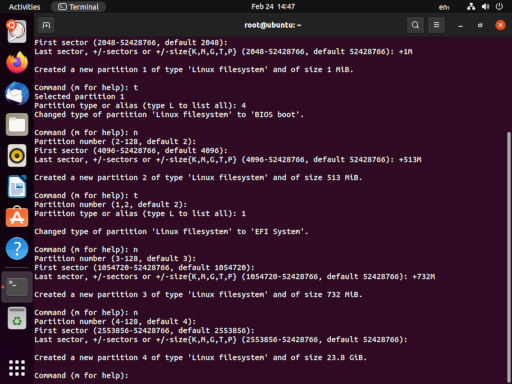
fdisk /dev/vda
g
n
<default>
<default>
+1M
t
4
n
<default>
<default>
+513M
t
<default>
1
n
<default>
<default>
+732M
n
<default>
<default>
<default>
w
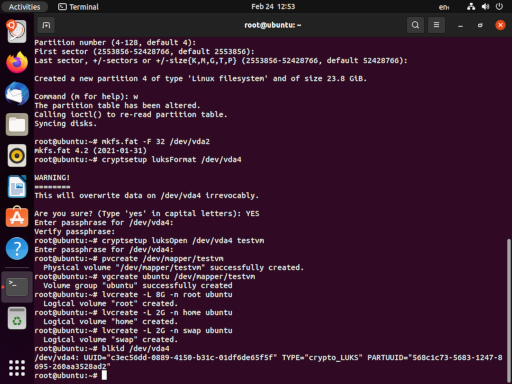
We don’t want to format the BIOS Boot partition (/dev/vda1). And, we don’t need to format the boot partition (/dev/vda3) because the installer can do that; but we do need to format the new EFI partition (the installer refuses to do this under the mistaken assumption that any existing EFI partition already has important stuff in it). EFI partitions are Fat32 partitions, assumedly so that Microsoft operating systems can interact with them.
mkfs.fat -F 32 /dev/vda2
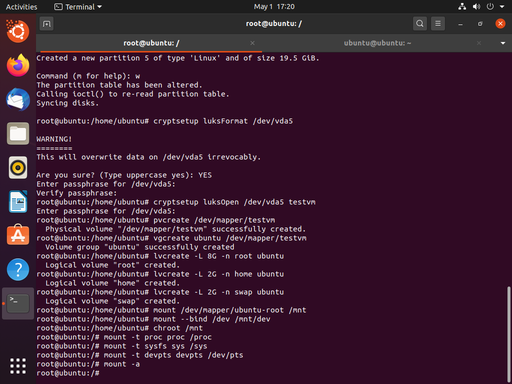
Additionally, we’ve got some work to do with encryption and LVM2. Let’s get encryption going first. We want to choose a name for the encrypted volume, because it will show up during the boot process. I like to use the name of the machine. Even though we’re only encrypting a part of the disk (almost all of it!), I like for the encryption to feel like it’s the whole machine. So, for this example, I’ll use testvm as the name.
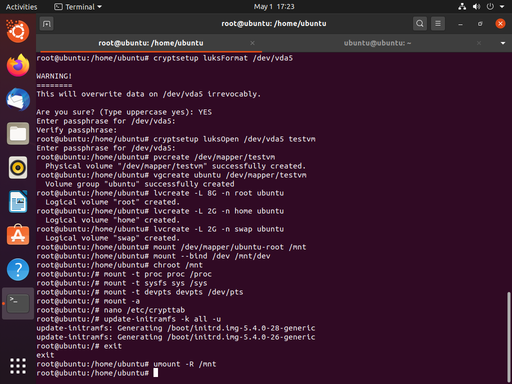
cryptsetup luksFormat /dev/vda4
You will have to answer YES and provide a passphrase for the disk.
cryptsetup luksOpen /dev/vda4 testvm
You will have to provide the passphrase again, to unlock the disk. This will create a new device named /dev/mapper/testvm.
Now we can continue on to LVM2. First we will mark the decrypted device as a physical volume for LVM2 using pvcreate. Then we will create a volume group, which I will call ubuntu. Finally we will create three logical volumes within the volume group, named root, home, and swap. Their ultimate uses should be obvious, and you may feel free to make any customizations you’d like here, though you will need to have a root volume.
pvcreate /dev/mapper/testvm
vgcreate ubuntu /dev/mapper/testvm
lvcreate -L 8G -n root ubuntu
lvcreate -L 2G -n home ubuntu
lvcreate -L 2G -n swap ubuntu
Now our pre-work is done, and we’re ready to run the installer.
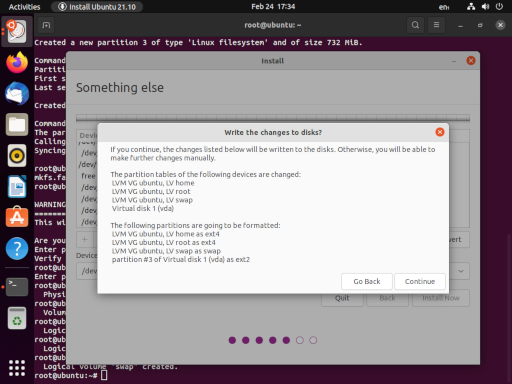
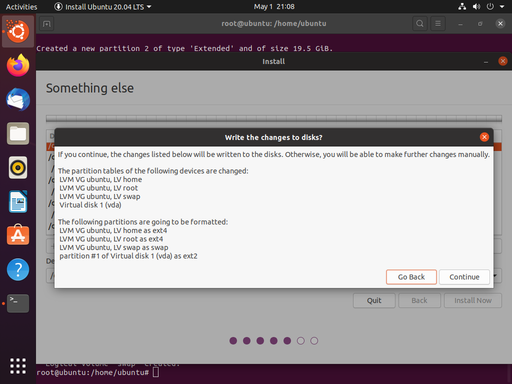
When the installer reaches the Installation type section, be sure to choose Something else, so we can tell the installer to use the partitions and volumes we just created. Select the following options:
/dev/mapper/ubuntu-root
- Use as: Ext4 journaling filesystem
- Format the partition: yes
- Mount point: /
/dev/mapper/ubuntu-home
- Use as: Ext4 journaling filesystem
- Format the partition: yes
- Mount point: /home
/dev/mapper/ubuntu-swap
- Use as: Swap area
/dev/vda3
- Use as: Ext2 filesystem
- Format the partition: yes
- Mount point: /boot
Use of the EFI partition (/dev/vda2) should be automatic. The BIOS Boot partition (/dev/vda1) should be largely ignored (though its existence is critical if you intend to boot via BIOS instead of UEFI).
The end result should produce the following:
When the installation is complete, we want to Continue Testing, we can return to our terminal and do some last minute tweaking.

Before we go any further, we want to grab the UUID of our encrpted disk (e.g. /dev/vda5). We’re going to use this in a configuration file inside our newly installed system. For ease, I usually open a second terminal tab (shift-ctrl-T) and type blkid /dev/vda4. This allows you to copy-paste (shift-ctrl-C, shift-ctrl-V) the UUID, instead of writing down on paper like some kind of barbarian.
Now we have to chroot into the newly installed system. This is the most complicated part of the story, and there’s a whole article about chroot right
here
. We need to mount our root partition at /mnt. Then we’ll need to mount some special pseudo-filesystems underneath /mnt. In the midst of all of that, we’ll jump in. As a final step, we will execute a mount -a to make sure that /boot and /boot/efi (and any other useful partitions, if you’re extending this exercise and doing something more complicated) are mounted.
The reason behind all of this is that we need to appear to be running the newly installed system when we update the initramfs at the end of all of this. The process looks like this:
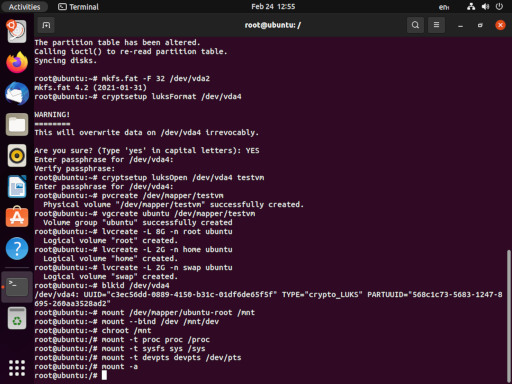
mount /dev/mapper/ubuntu-root
mount --bind /dev /mnt/dev
chroot /mnt
mount -t proc proc /proc
mount -t sysfs sys /sys
mount -t devpts devpts /dev/pts
mount -a
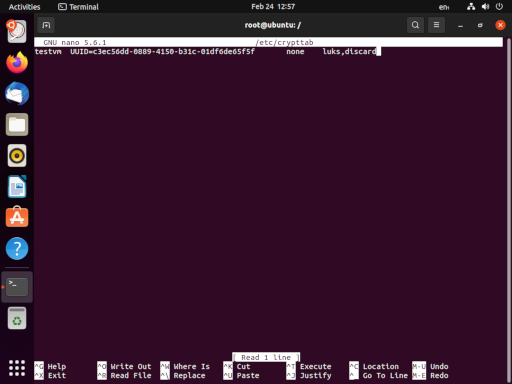
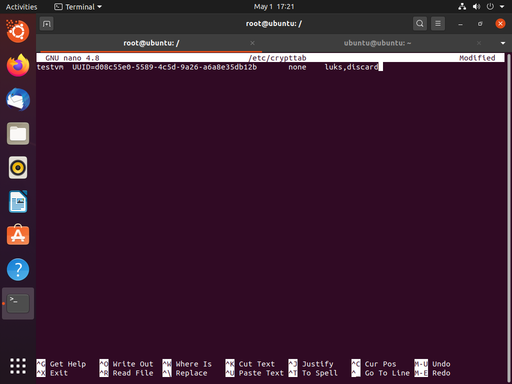
Now we want to edit (create) the /etc/crypttab file with nano (or your favorite editor). This file instructs the crypto system which devices to decrypt and how; it is similar in purpose and structure to the /etc/fstab file. Our entry will have four fields: the name of the decrypt device (testvm), the encrypted device (the UUID of /dev/vda5), the password (none, because it will be provided at boot time), and options. Note that while blkid returned the UUID in quotes, it is not surrounded by quotes in the /etc/crypttab file. Our example looks like:
testvm UUID=1960e826-e2a1-45db-a6ef-6fc979515ed6 none luks,discard
Now the stage is set to rebuild the initramfs, the non-kernel parts of linux that are used to initialize the boot process. In order to rebuild it, we use update-initramfs -k all -u. These options will cause the script to update the initramfs for all kernels installed on the system.
Now we can back out of our chroot with a simple exit command.
Back in our parent shell, we can unmount /mnt (recursively, to sweep up everything else) with umount -R /mnt.
Now we can exit our shell processes and reboot the system.
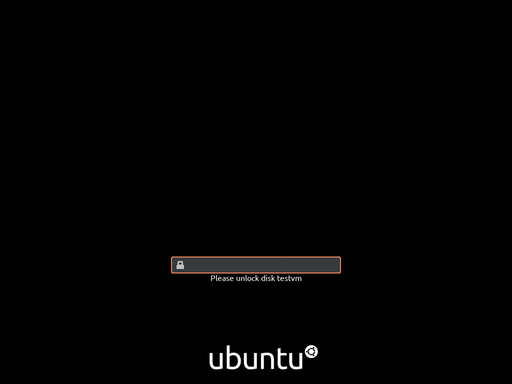
After the reboot, we should be greated by the system requesting our encryption passpharse to unlock testvm. Depending on your environment, the current state of Ubuntu, and possibly the phase of the moon… you might instead be greeted by a black screen. This is a combined failure of grub and plymouth to properly handle the video for your system. Most of the time you can type in your password and press enter despite a lack of visual feedback.
Congratulations!
Custom Encryption in Pop!_OS 20.04
05/01/2020 - ~3 Minutes
System 76 produces an Ubuntu-based Linux distribution called Pop!_OS . It contains better support than vanilla Ubuntu with respect to encrypted volumes, but only by a little bit. The improvements have to do with its ability to deal with disk allocation schemes created before starting the installer; the installer itself offers the same default named decrypt device with a single logical volume filling all available space. However, we can accomplish quite a bit by doing some work up front. And, unlike the Ubuntu scenario outlined in Setting Up Custom Encryption in Ubuntu 20.04 (Focal Fossa) , there is no need to swing back at the end to rebuild the initramfs. The only real caveat is that we have to let the installer open the encrypted volume. So this time, we’ll set everything up, and then close the encrypted volume before starting the installer.
Walk through the installer to configure the language and keyboard, until you reach the Clean Install vs Custom (Advanced) fork in the road.

At this point, launch a terminal window with super-T. If you’re new to Linux, the super key is the Windows key or the Command/Apple key.
In the terminal we’re going to use fdisk to create a partition scheme identical to the one in the Ubuntu article . The end result should be something like

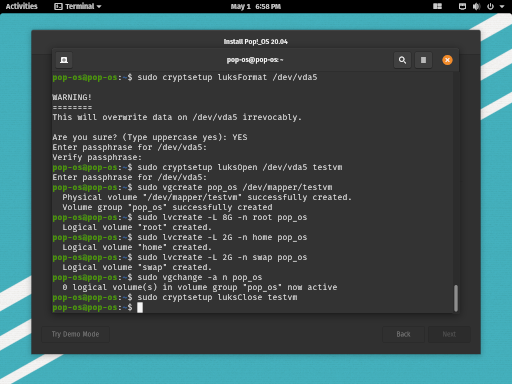
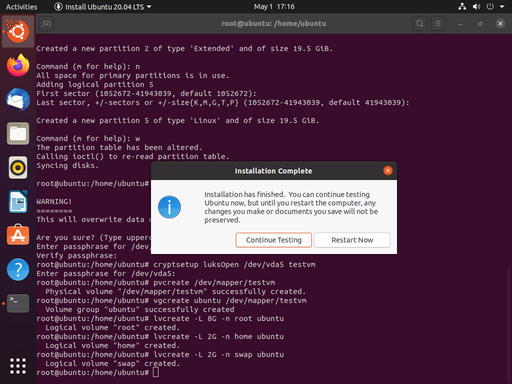
Using cryptsetup to build or encrypted device leverages just two commands. As with Ubuntu, the /dev/vda device will likely be different on your machine (most likely /dev/sda). The final argument in the luksOpen line is the name you are giving to the decrypted volume. Not only can this be anything you’d like, it is completely arbitrary here; the real name will be established in the installer.
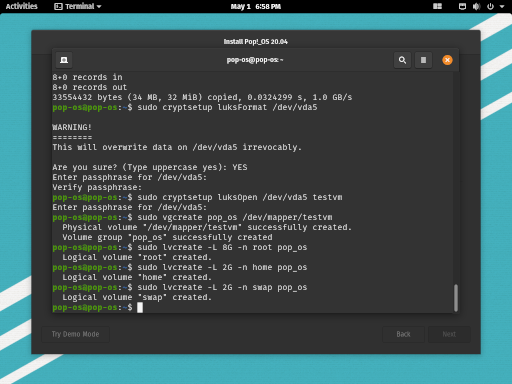
sudo cryptsetup luksFormat /dev/vda5
sudo cryptsetup luksOpen /dev/vda5 testvm

Now, we’ll repeat the LVM2 magic from the Ubuntu article. First mark the decrypted volume as a physical volume for LVM with pvcreate /dev/mapper/testvm. Then create a new volume group with vgcreate pop_os /dev/mapper/testvm. Finally, create the three logical volumes for root, home, and swap.
sudo pvcreate /dev/mapper/testvm
sudo vgcreate pop_os /dev/mapper/testvm
sudo lvcreate -L 8G -n root pop_os
sudo lvcreate -L 2G -n home pop_os
sudo lvcreate -L 2G -n swap pop_os
Before continuing in the installer, we need to deactivate all these special devices. This installer must open these devices itself in order to work properly. So, first, deactivate the volume group with vgchange -a n pop_os and then close the decrypted volume with cryptsetup luksClose testvm.
sudo vgchange -a n pop_os
sudo cryptsetup luksClose testvm
Back in the installer, choose Custom (Advanced). When the disk layout is displayed, click on the large (luks) volume to decrypt. At this point, choose the name you want to use as the device name. Also, provide the correct password.

Once you click Decrypt, the volume group should appear along with all your defined logical volumes. Mark all the devices appropriately. Don’t forget the /boot partition on /dev/vda1. Then click Erase and Install.

When the installation is complete, you can click Restart Device.

When Pop!_OS restarts, you should be greeted by the decryption prompt.

Congratulations!
Setting Up Custom Encryption in Ubuntu 20.04 (Focal Fossa)
04/27/2020 - ~7 Minutes
This post uses a lot of information from chroot For Fun and Profit .
The Ubuntu Linux distribution from Canonical gets a lot of praise; it also gets a lot of complaints. A lot of those complaints have to do with its installer. To be fair, the desktop installer is pretty good for beginners. It walks you through a series of intelligible steps, sets up a basic system with little or no fuss, and most non-default settings can easily be tweaked after the install. But, there’s always an exception….
The organization of disk storage, especially as it relates to encryption and thin provisioning of logical volumes, is a bit of a mess. If you tell the installer you want to use logical volume management, it complies by creating one logical volume that spans the entire disk. If you tell the installer you want encryption, you wind up with a similarly un-friendly configuration. So, most advanced users choose to manually configure the disks prior to running the installer. But, with encryption, this results in some complexity that needs to be explained.
The boot process is sufficiently advanced to handle LVM2 without any special intervention after the install. So, if you have configured LVM2 and have your disks carved into logical volumes, everything will just work. The boot process requires some setup within the installation before encryption will work. If you setup encryption, you have to do some tinkering after the installer is done, or you will wind up with an unbootable (albeit recoverable) system.
So, here’s our scenario.
The Hardware
We will use a single 20GB hard disk. The size is not important, but the examples will reflect that. We are going to break the disk into two partions, a small (512MB) boot parition, and the remainder of the disk in a single logical partition that will be encrypted. On that encrypted device, we will use LVM2 to allow for arbitrary partitions. These paritions will start small, but we can extend them later, via lvextend and resize2fs, should we want more space.
The Process
We will boot the machine (in the case of our example, a virtual machine) with the Ubuntu 20.04 Focal Fossa amd64 Desktop Distribution. After booting, we will choose Try Ubuntu, which will allow us to do some disk setup prior to running the installer. After the installer, we will choose to Continue Testing instead of immediately rebooting, which will allow us to do some tweaking of the boot process to compensate for encryption.
Partitioning with fdisk
After getting to the Ubuntu desktop, you can press ctrl-alt-T to launch terminal; you can also just find it in the menus. Once in the terminal, I usually type sudo -s to elevate privilege since everything we do will require superuser permissions.
The next step is to confirm the disk device we’ll be using. This is done with fdisk -l which lists the disks available for partitioning. In your case, the disk will almost surely be /dev/sda, but for our example, it’s /dev/vda. The following screenshot captures the interaction with fdisk. The final step is to use w to write the new partition table and exit.
fdisk /dev/vda
n
<default>
<default>
<default>
+512M
n
e
<default>
<default>
<default>
n
<default>
<default>
w
We don’t need to format the boot partition (/dev/vda1) because the installer can do that. But we’ve got some work to do with encryption and LVM2. Let’s get encryption going first. We want to choose a name for the encrypted volume, because it will show up during the boot process. I like to use the name of the machine. Even though we’re only encrypting a part of the disk (almost all of it!), I like for the encryption to feel like it’s the whole machine. So, for this example, I’ll use testvm as the name.
cryptsetup luksFormat /dev/vda5
You will have to answer YES and provide a passphrase for the disk.
cryptsetup luksOpen /dev/vda5 testvm
You will have to provide the passphrase again, to unlock the disk. This will create a new device named /dev/mapper/testvm.
Now we can continue on to LVM2. First we will mark the decrypted device as a physical volume for LVM2 using pvcreate. Then we will create a volume group, which I will call ubuntu. Finally we will create three logical volumes within the volume group, named root, home, and swap. Their ultimate uses should be obvious, and you may feel free to make any customizations you’d like here, though you will need to have a root volume.

pvcreate /dev/mapper/testvm
vgcreate ubuntu /dev/mapper/testvm
lvcreate -L 8G -n root ubuntu
lvcreate -L 2G -n home ubuntu
lvcreate -L 2G -n swap ubuntu
Now our pre-work is done, and we’re ready to run the installer.
When the installer reaches the Installation type section, be sure to choose Something else, so we can tell the installer to use the partitions and volumes we just created. Select the following options:
/dev/mapper/ubuntu-root
- Use as: Ext4 journaling filesystem
- Format the partition: yes
- Mount point: /
/dev/mapper/ubuntu-home
- Use as: Ext4 journaling filesystem
- Format the partition: yes
- Mount point: /home
/dev/mapper/ubuntu-swap
- Use as: Swap area
/dev/vda1
- Use as: Ext2 filesystem
- Format the partition: yes
- Mount point: /boot
The end result should produce the following:
When the installation is complete, we want to Continue Testing, we can return to our terminal and do some last minute tweaking.
Before we go any further, we want to grab the UUID of our encrpted disk (e.g. /dev/vda5). We’re going to use this in a configuration file inside our newly installed system. For ease, I usually open a second terminal tab (shift-ctrl-T) and type sudo blkid /dev/vda5. This allows you to copy-paste (shift-ctrl-C, shift-ctrl-V) the UUID, instead of writing down on paper like some kind of barbarian.

Now we have to chroot into the newly installed system. This is the most complicated part of the story, and there’s a whole article about chroot right here . We need to mount our root partition at /mnt. Then we’ll need to mount some special pseudo-filesystems underneath /mnt. In the midst of all of that, we’ll jump in.
The reason behind all of this is that we need to appear to be running the newly installed system when we update the initramfs at the end of all of this. The process looks like this:
mount /dev/mapper/ubuntu-root
mount --bind /dev /mnt/dev
chroot /mnt
mount -t proc proc /proc
mount -t sysfs sys /sys
mount -t devpts devpts /dev/pts
mount -a
Now we want to edit (create) the /etc/crypttab file with nano (or your favorite editor). This file instructs the crypto system which devices to decrypt and how; it is similar in purpose and structure to the /etc/fstab file. Our entry will have three fields: the name of the decrypt device (testvm), the encrypted device (the UUID of /dev/vda5), the password (none, because it will be provided at boot time), and options. Note that while blkid returned the UUID in quotes, it is not surrounded by quotes in the /etc/crypttab file. Our example looks like:
testvm UUID=1960e826-e2a1-45db-a6ef-6fc979515ed6 none luks,discard
Now the stage is set to rebuild the initramfs, the non-kernel parts of linux that are used to initialize the boot process. In order to rebuild it, we use update-initramfs -k all -u. These options will cause the script to update the initramfs for all kernels installed on the system.

Now we can back out of our chroot with a simple exit command.
Back in our parent shell, we can unmount /mnt (recursively, to sweep up everything else) with umount -R /mnt.
Now we can exit our shell processes and reboot the system.
After the reboot, we should be greated by the system requesting our encryption passpharse to unlock testvm.
Congratulations!
chroot for Fun and Profit
04/04/2019 - ~5 Minutes
A fundamental part of a linux install, chroot is a powerful process isolation tool and one of
the precursors to today’s container technology. In this article, I want to quickly cover the basic
incantation of chrooting an Ubuntu Linux install.
This can be used to do some cool stuff immediately post-install. It can also be critical to rescuing a system that can no longere boot itself.
The general idea behind chroot is that “while booted into a running system, we can mount the
filesystem(s) of another install, and create a shell process that sees the second install as the
root filesystem.” This is what gives us the name chroot (or change root). Once you have executed
chroot you will not have any access outside the provided root filesystem tree. This allows you
to behave as if you are live within the chrooted filesystem.
There is a lot of information on this out at Linux From Scratch, Gentoo, and Arch Linux. All of these sites show you how to use chroot to create a new Linux installation from raw filesystems.
All you need to get started is a Linux machine, and a Live CD/USB. We will
- Boot from the Live CD/USB
- Mount the root filesystem of the installed system
- Do some special mounting of some devices
chrootinto the mount point- Do a little more special mounting
- Mount the rest of the filesystem(s), if any
- Have fun!
Boot from the Live CD/USB
You don’t really need help with this part, do you?
Mounting the root filesystem of the installed device, the Short Form
In a simple installation, there’s just one partition – the root partition. We want to mount that onto our /mnt point. So, let’s pretend that /dev/sda is our installed disk, making /dev/sda1 our partition. We would then
mount /dev/sda1 /mnt
Now, we can continue on to Do Some Special Mounting of Some Devices .
Mounting the root filesystem of the installed device, the Long Form
Let’s pretend that your installation was a little complicated. If it wasn’t, then this part gets a lot simpler. Let’s say you created a /boot partition on /dev/sda1, but then you have the rest of you install in LVM logical volumes that are hidden behind an encrypted /dev/sda5. Does that sound hokey enough for you? OK. Let’s roll.
Let’s decrypt the filesystem on /dev/sda5. We’ll create a dummy device called /dev/mapper/targetdisk, by virtue of the final argument below. We’ll be asked for the passphrase used when creating this disk. If you don’t have that passphrase, you can’t continue. The disk really is safely encrypted/locked behind that passphrase.
sudo cryptsetup luksOpen /dev/sda5 targetdisk
Since we concocted a super complicated partitioning scheme, we’re only about half-way through
mounting the root filesystem. Now we have to break out LVM2 and take things to the next level.
Step one is to find the logical volume that exists on /dev/mapper/targetdisk. The easiest way is
to use vgscan to scan for new volume groups.
sudo vgscan
Pay attention to the output, because you should see the name of a volume group from the newly
decrypted disk. We’ll need that name when we activate the volume group with vgchange. For
purposes of this example, we’ll pretend the volume group is called ubuntu-vg, which happens
to be the default name for volume groups created by the installer.
sudo vgchange -ay ubuntu-vg
We can now run lvscan to see all the new logical volumes that have become available to us.
It is also possible that you just know the names of the logical volumes, since it’s probably
your system that you’re playing with. Let’s pretend you found the volume used as the root, and
it happens to be called root-lv. Now, we can mount that in a convenient place, like /mnt.
sudo mount /dev/ubuntu-vg/root-lv /mnt
Do Some Special Mounting of Some Devices
This is a simple enough command. Simple enough to forget.
We want to mount the /dev filesystem into the /mnt/dev using the --bind option that will let
us mount one thing into two places. Any interaction with the /dev filesystem or the /mnt/dev
filesystem will be reflected in the other, because they are just two views of the same thing.
sudo mount --bind /dev /mnt/dev
chroot into the mount point
We’re finally ready for the big show! And, it will be a little disappointing after the complexity of mounting the root filesystem. But here it is…
sudo chroot /mnt
There is an optional parameter to define a custom program (shell) to run in the new environment, but
most likely we’ll just stick with what we were running before (most likely bash).
What may look odd to you is that you appear to be sitting at the / directory. In reality, you
are at the place formerly known as /mnt. But, now it appears as / from your new (chrooted)
perspective.
Do a little more special mounting
There are three special filesystems that we wait to mount until after the chroot. These will make your chroot environment complete.
mount -t proc proc /proc
mount -t sysfs sys /sys
mount -t devpts devpts /dev/pts
Mount the rest of the filesystem(s), if any
At this point, the remaining filesystem(s), if any, will be defined in /etc/fstab and can be
mounted quite quickly with a simple
mount -a
Have fun!
No you can enjoy your chrooted environment. You can install packages. You can reinstall the bootloader. The sky is the limit!